Building a Discord Server from Scratch: A Step-by-Step Guide
Building a Discord Server from Scratch: A Step-by-Step Guide
Blog Article
Creating a Discord server can be an exciting journey for anyone looking to build a community around shared interests, gaming, or professional collaborations. With its user-friendly interface and broad range of features, Discord offers a platform where members can communicate through text, voice, and video channels. Whether you are a gamer wanting to bring your friends together or an enthusiast looking to gather like-minded individuals, this guide will walk you through the essential steps to set up a thriving Discord server from the ground up.
In this guide, we will explore everything you need to know to establish your own Discord server, including choosing the right server settings, organizing channels, and managing community engagement. By the end, you will have the tools and knowledge to create a welcoming environment that not only attracts members but keeps them actively involved. Let's dive into the world of Discord servers and start building your digital community.
Creating Your Discord Server
Creating your Discord server is the first crucial step in building a community. To begin, open the Discord application or visit the Discord website. Once logged in, locate the "+" icon on the left sidebar. This is where you will create your new server. After clicking on the icon, choose "Create My Own" and select whether you want it to be for a group or a community. This choice will impact how you set up your server down the line.
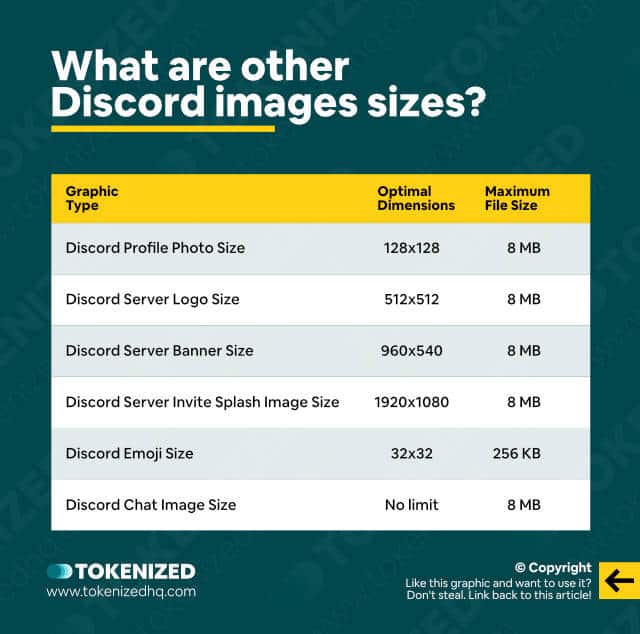
Next, you’ll need to name your server and choose a region. The name should reflect the purpose of your server, making it easy for members to understand what your community is about. Selecting the appropriate server region helps minimize latency during voice chats, enhancing the overall experience for your members. After naming your server, you can also upload an image to use as the server icon. This adds a personal touch and makes your server more visually appealing.
Discord Boosts for Servers
After setting up the initial details, you’ll find yourself on your new server's dashboard. Here, you can start organizing your server by creating channels and categories. Channels can be text-based or voice-based, depending on the needs of your community. Think about what topics or activities your server will focus on when creating these channels. As you expand your server, you can also set permissions for different roles to manage the community effectively.
Setting Up Channels and Roles
When building a Discord server, setting up channels and roles is crucial to create an organized and engaging environment for members. Start by considering the purpose of your server. Determine which categories of channels will be necessary, such as text channels for discussion, voice channels for chatting, and announcement channels for important updates. You can create separate channels for different topics or activities, ensuring that conversations stay relevant and focused.
Next, establish roles for your members. Roles not only help categorize users but also allow you to manage permissions effectively. Create roles based on hierarchy, such as Admin, Moderator, and Member, each with different levels of access and authority. You might also want to introduce specialized roles for contributors or event organizers. This structure will help maintain order within the server and make it easier for members to identify who to approach for assistance or information.
Finally, consider how to customize the roles and channels to fit your community's culture. You can name channels and roles creatively to reflect the theme of your server, fostering a unique identity. Additionally, think about how to use permissions to limit or grant access based on roles, ensuring that only authorized users can post in announcement channels or manage content. This careful planning will create a welcoming and functional space for all members.
Inviting Members and Managing Community
Inviting members to your Discord server is a crucial step in building an engaging community. Start by sharing your server’s invite link on social media platforms, relevant forums, or through direct invitations to friends. Be clear about the purpose of your server and what members can expect. Consider creating a welcoming message that outlines the rules and goals of the community, which encourages new members to engage and participate.
Once you have members joining your server, managing the community effectively becomes essential. Assign roles to members to create a structure within the server. This can include roles for moderators, special contributors, and general members. Establish clear guidelines on behavior, and make use of bots for moderation and organization. Regularly check in on conversations and activities, and ensure that the community is a positive and welcoming space for everyone.
Engagement is key to maintaining a lively Discord server. Host regular events, game nights, or discussions that align with your server’s theme. Encourage members to share their ideas and feedback to foster a sense of ownership and investment in the community. By actively managing interactions and creating opportunities for connection, your Discord server can thrive and grow into a vibrant space for all members.
Report this page